
Programmer | DevTools & Open Source
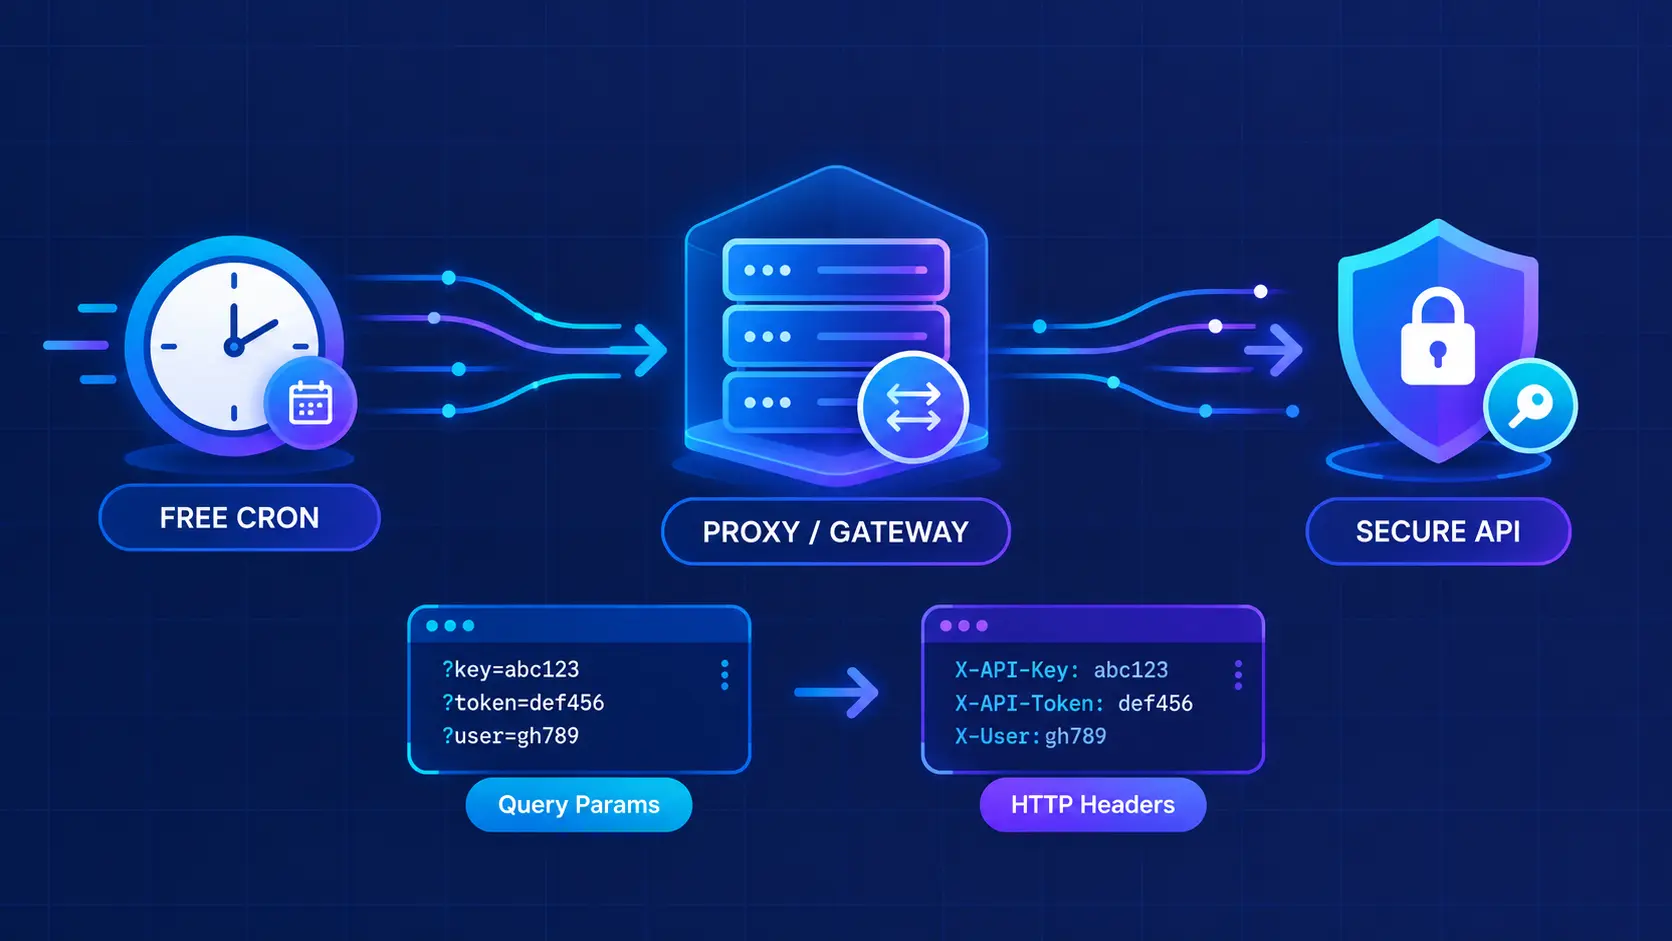
How to Add Custom Headers to Free Cron Services
Build a tiny proxy server to work around header limitations in free cron services.
Free cron services are great for scheduling automated tasks, but they come with a frustrating limitation: no custom HTTP headers. If your API requires authentication through headers likeX-API-KeyorX-Auth-Token, most free tier services won’t work—unless you get creative.
This post shows you how to build a lightweight proxy server that transforms query parameters into custom headers, letting you use any free cron service with header-based authentication APIs.
The Problem
Many APIs use custom headers for authentication or request metadata. Here’s a typical example:
GET /api/tasks/cleanup
X-API-Key: your-secret-key
X-Request-Source: cron-job
Most free cron services support GET requests with query parameters but don’t let you add custom headers. Paid tiers unlock this feature, but for simple scheduled tasks? That feels like overkill.
You’re left with three options:
- Pay $5-15/month for header support
- Build your own cron server
- Get creative with a proxy
Let’s go with option three.
The Solution
Build a tiny proxy that:
- Receives credentials as query parameters (free tier compatible)
- Converts them to headers for your actual API
- Returns the response back to the cron service
The entire solution is about 40 lines of code and costs $0 to run on serverless platforms like Vercel, Netlify, or Cloudflare Workers.
How the Flow Works
graph LR
    A[Cron Service] -->|GET /?key=SECRET| B[Proxy Server]
    B -->|Extract query param| C{Transform}
    C -->|Add X-API-Key header| D[Your API]
    D -->|Response| B
    B -->|Response| A

    style A fill:#3b82f6,stroke:#1e40af,stroke-width:2px,color:#fff
    style B fill:#8b5cf6,stroke:#6d28d9,stroke-width:2px,color:#fff
    style C fill:#06b6d4,stroke:#0891b2,stroke-width:2px,color:#fff
    style D fill:#10b981,stroke:#059669,stroke-width:2px,color:#fff
Building the Proxy
Project Setup
Start with a minimal Express app:
mkdir cron-header-proxy
cd cron-header-proxy
npm init -y
npm install express
Your project structure will look like this:
cron-header-proxy/
├── index.js           # Main proxy server code
├── package.json       # Dependencies and scripts
├── vercel.json        # Deployment configuration (optional)
├── .gitignore         # Git ignore rules
└── node_modules/      # Installed packages
Create a.gitignorefile to exclude dependencies from version control:
# Dependencies
node_modules/

# Environment variables
.env
.env.local

# Vercel
.vercel
Updatepackage.jsonto use ES modules:
{
  "name": "cron-header-proxy",
  "version": "1.0.0",
  "type": "module",
  "scripts": {
    "dev": "NODE_ENV=development node --watch index.js",
    "start": "NODE_ENV=production node index.js"
  },
  "dependencies": {
    "express": "^5.3.0"
  }
}
The Proxy Code
Createindex.js:
import express from "express";

const app = express();
const mode = process.env.NODE_ENV;

// Configure your target API endpoint
const TARGET_API =
  process.env.TARGET_API || "https://api.example.com/tasks/cleanup";

app.get("/", async (req, res) => {
  try {
    const url = new URL(`http://localhost${req.url}`);

    // Extract API key from query parameter
    const apiKey = url.searchParams.get("key")?.replaceAll("%20", " ");

    // Forward request with API key as header
    const response = await fetch(TARGET_API, {
      method: "GET",
      headers: {
        "X-API-Key": apiKey,
      },
    });

    // Return the API response
    const data = await response.json();
    return res.status(response.status).json(data);
  } catch (error) {
    console.error("Proxy error:", error);
    res.status(500).json({
      success: false,
      message: error?.message || "Request failed",
    });
  }
});

if (mode === "development") {
  app.listen(8080, () => console.log("Proxy running at http://localhost:8080"));
}

export default app;
How It Works
- Query Parameter Extraction: The proxy reads the API key from the URL (
?key=...) - Header Transformation: Converts the query parameter into an
X-API-Keyheader - Request Forwarding: Calls your actual API with proper authentication
- Response Passthrough: Returns whatever your API returns, preserving the status code
The.replaceAll("%20", " ")handles URL encoding if your API key contains spaces.
Deploying to Vercel
Add avercel.jsonconfiguration:
{
  "version": 2,
  "builds": [
    {
      "src": "index.js",
      "use": "@vercel/node"
    }
  ],
  "routes": [
    {
      "src": "/(.*)",
      "dest": "index.js"
    }
  ]
}
Deploy:
npm i -g vercel
vercel
Vercel gives you a URL likehttps://cron-header-proxy.vercel.app. Test it:
curl "https://cron-header-proxy.vercel.app/?key=your-api-key"
Environment Variables
Set your target API URL without hardcoding it:
vercel env add TARGET_API
# Enter: https://api.yourdomain.com/endpoint
Then update your code to use it:
const TARGET_API = process.env.TARGET_API;
Setting Up Your Cron Job
Now point your free cron service to the proxy:
- Go to your cron service
- Create a new job with this URL:
https://your-proxy.vercel.app/?key=YOUR_API_KEY - Set your desired schedule (every hour, daily at 2am, etc.)
- Save and enable
The cron service makes a simple GET request with query parameters. Your proxy transforms it into a properly authenticated API call with headers. Your actual API never knows the difference.
URL Encoding Your API Key
If your API key contains special characters (like spaces,+,&,=, or/), you need to URL-encode it before adding it to the cron URL. Otherwise, these characters might break the URL or be misinterpreted.
Using an online tool:
Visit urlencoder.org and paste your API key. The encoded version will be safe to use in URLs.
Or you can use your prefered Language e.g.
-
JavaScript:
const apiKey = "my-key+with/special=chars"; const encodedKey = encodeURIComponent(apiKey); console.log(encodedKey); // my-key%2Bwith%2Fspecial%3Dchars // Use in your cron URL const cronUrl = `https://your-proxy.vercel.app/?key=${encodedKey}`; -
PHP:
<?php $apiKey = "my-key+with/special=chars"; $encodedKey = urlencode($apiKey); echo $encodedKey; // my-key%2Bwith%2Fspecial%3Dchars // Use in your cron URL $cronUrl = "https://your-proxy.vercel.app/?key=" . $encodedKey; ?> -
Python:
from urllib.parse import quote

api_key = "my-key+with/special=chars"
encoded_key = quote(api_key)
print(encoded_key)  # my-key%2Bwith%2Fspecial%3Dchars

# Use in your cron URL
cron_url = f"https://your-proxy.vercel.app/?key={encoded_key}"
Common characters that need encoding:
- Space →
%20 +→%2B/→%2F=→%3D&→%26?→%3F
Your proxy’s.replaceAll("%20", " ")handles URL-encoded spaces automatically, and the browser decodes other characters before passing them to your API.
Local Development
Test locally before deploying:
# Set your target API
export TARGET_API="https://api.example.com/tasks/cleanup"

# Run the proxy
npm run dev
Visithttp://localhost:8080/?key=test-keyor use curl:
curl "http://localhost:8080/?key=your-api-key&source=local-test"
The server runs with Node’s--watchflag, so it automatically restarts when you editindex.js.
Security Considerations
While this approach works well, keep these points in mind:
-
Use HTTPS in Production
Query parameters are visible in URLs. HTTPS encrypts the entire request, including the URL. Vercel, Netlify, and Cloudflare provide HTTPS automatically—no configuration needed.
-
Keep Secrets Private
Don’t hardcode API keys in your cron service’s public dashboard if others can see it. Some cron services let you store secrets in environment variables—use those when available.
-
Rotate Credentials Periodically
Change your API keys every few months as good security hygiene. Update both your API and your cron job URL when you do.
-
Add Rate Limiting
If your proxy URL leaks, someone could spam your API. Add rate limiting middleware:
npm install express-rate-limitimport rateLimit from "express-rate-limit"; const limiter = rateLimit({ windowMs: 15 * 60 * 1000, // 15 minutes max: 100, // limit each IP to 100 requests per window message: { error: "Too many requests, please try again later" }, }); app.use(limiter); -
Validate Required Parameters
Reject requests missing required credentials:
app.get("/", async (req, res) => {
  const url = new URL(`http://localhost${req.url}`);
  const apiKey = url.searchParams.get("key");

  if (!apiKey) {
    return res.status(400).json({
      error: "Missing required parameter: key",
    });
  }

  // ... rest of proxy logic
});
Advanced Use Cases
-
Transform POST to GET
Some APIs only accept POST, but your cron service only makes GET requests:
app.get("/", async (req, res) => { const url = new URL(`http://localhost${req.url}`); const apiKey = url.searchParams.get("key"); const response = await fetch(TARGET_API, { method: "POST", headers: { "X-API-Key": apiKey, "Content-Type": "application/json", }, body: JSON.stringify({ trigger: "scheduled", timestamp: Date.now() }), }); return res.json(await response.json()); }); -
Webhook Transformation
Many webhook services also lack header support. Use the same pattern:
app.post("/webhook", async (req, res) => { const signature = req.query.signature; const response = await fetch("https://api.example.com/webhooks", { method: "POST", headers: { "X-Webhook-Signature": signature, "Content-Type": "application/json", }, body: JSON.stringify(req.body), }); return res.json(await response.json()); }); -
Customizing for Your API
Adapt the header mapping to match your API’s requirements:
// For Bearer token authentication
const response = await fetch(TARGET_API, {
  headers: {
    Authorization: `Bearer ${url.searchParams.get("token")}`,
  },
});

// For multiple custom headers
const response = await fetch(TARGET_API, {
  headers: {
    "X-API-Key": url.searchParams.get("key"),
    "X-User-ID": url.searchParams.get("user"),
    "X-Workspace": url.searchParams.get("workspace"),
  },
});

// For basic auth
const username = url.searchParams.get("user");
const password = url.searchParams.get("pass");
const response = await fetch(TARGET_API, {
  headers: {
    Authorization: `Basic ${Buffer.from(`${username}:${password}`).toString("base64")}`,
  },
});
Why This Works Better Than Paid Tiers
For simple scheduled tasks, this proxy approach beats upgrading to premium cron services:
- $0 monthly cost: Vercel’s free tier includes 100GB bandwidth and 100 hours of serverless execution—more than enough for cron jobs
- Zero maintenance: No servers to patch, no uptime monitoring, no infrastructure management
- 5-minute setup: From nothing to deployed faster than signing up for a paid plan
- Portable: Works with any cron service, so you’re never locked into a specific provider
- Flexible: Easy to add logging, rate limiting, or multiple endpoints
The proxy pattern solves the technical limitation creatively instead of paying to remove it.
Real-World Performance
This pattern handles production workloads well:
- Response time: Typically adds 50-100ms overhead vs direct API calls
- Reliability: Serverless platforms have 99.9%+ uptime SLAs
- Scalability: Automatically handles spikes in traffic
- Cost: Remains free unless you’re making millions of requests monthly
For scheduled tasks running hourly or daily, the performance is more than adequate.
Conclusion
Sometimes the best solution isn’t upgrading to a premium tier—it’s building a tiny adapter that solves exactly your problem. This 40-line proxy turns any free cron service into one that supports custom headers.
The pattern applies beyond cron jobs too. Anytime you need to bridge incompatible API interfaces—webhooks without header support, POST-only APIs with GET-only clients, or authentication format mismatches—a lightweight proxy server is often the simplest path forward.
Deploy it once, configure your cron service, and never think about it again. Your scheduled tasks run reliably, your API stays secure, and you keep your money in your pocket.